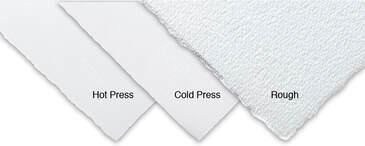
 In this month's blog, you will learn about to choose which paper is best for your drawing and painting needs. With so many brands of drawing and watercolor papers on the shelves of your local art stores, choosing the right paper to get started can be a daunting challenge. So the big question, how do I choose the right paper for my idea? Rather you are a beginner or a professional, papers will come in different forms, qualities, surfaces, and weights. Each will respond differently to the paints or pencils you choose as well as to various painting techniques. Here are several things to consider that I use to help you narrow down the confusion, and get you started with drawing or painting your subject matter. So lets start with watercolor paper. HOT PRESS AND COLD PRESS PAPER Hot press is super smooth and has no texture. This paper is less absorbent than cold press. Because it doesn’t suck up the water as fast as the cold press, it allows you to play around more, like re-wetting edges of pigment. Cold press watercolor paper has texture and is more absorbent than hot press. This means you have slightly less time to move the paint around the surface before the pigments fix to the paper. Colors are less rich and slightly paler when using cold press paper. Cold press is a good choice when you want to convey texture in your subject. The texture of the paper itself adds to the aesthetic appeal of the final painting. Paint pigments settle and dry in the grooves and less on the ridges of the paper, revealing the texture of the paper, and contributing to the appearance of the finished artwork. Weight and Thickness As you probably know, watercolor paper is available in different thicknesses. Thickness is indicated by the weight of the paper. The weight is labeled as gsm or g/m2 or lb. GSM refers to grams per square meter and is a more recent and more accurate measure of the weight and thickness of watercolor paper. So, logically, the greater the weight, the thicker the sheet. Typically when you go to the local art store, they only sell the standard weights of paper such as 90 lb (190 gsm), 140 lb (300 gsm), and 300 lb (638 gsm). My preference is 300 lbs for my watercolors. Experiment with different weights to see what works best for your idea. DRAWING PAPERS & BOARDS  Now lets briefly talk about drawing and board papers. Drawing paper is ideal for sketching, and the medium surface is perfect for illustrations and final drawings. They can be purchased as a wire-bound pad, sheets or boards, suitable for any dry media, including graphite and colored pencil, charcoal, sketching stick, pen and ink, as well as marker, mixed media and pastels.
The selection of paper for shading techniques is influenced by the type of pencil used, the degree of darkness desired, the shading technique used, and the expression of the shading technique desired. The key is to select a paper surface (medium or smooth) based upon the effects you’re looking to achieve. As a general rule, a medium or textured surface will be able to produce a more even, luminescent shade than a smooth surface. I only use strathmore 300 Series Bristol boards (shown above) for all of my drawing because of it smooth texture grain. Textured vs Smooth Surface Paper The smoother the paper grain the more difficult it will be to produce an even shade. Smooth paper surface cannot produce as great a range of tone (shade) as textured surface papers. Textured paper surfaces are usually chosen for shading as the texture of the paper makes shading easier and produces a greater range of tone that can be more evenly applied. Strathmore Textured Papers The higher the grade of textured paper surfaces the deeper and more even the resulting shading will be. While all Strathmore Series – 200, 300, 400 and 500 will produce even, deep, luminescent shades, the 500 papers will produce the richest and deepest shade. I hope this was very helpful in making your selection with the many different brands of watercolors. Until next time, be creative in all that you do!
0 Comments
 In this month's blog, you will learn about techniques to help you choose what subject matter to draw or paint for your art compositions. So the big question, what makes an artist choose a subject and paint it in a particular way? Artists alike have their own reasons for how they compose or make subject matter choices in a drawing or painting. Sometimes we work on a theme or genre for a while, what simply catches our eye and other times approach a more complex idea. Rather you are a beginner or a professional, it takes time to train your eye to frame in a composition and know that it composes well. Sometimes when you look at a blank page, your mind goes blank too. You truly have set aside the time and the desire to draw or paint, but what? Here are several things to consider that I use to help you narrow down the confusion, and get you started with drawing or painting any subject matter. Collect Artifacts Whether its from a vision or a dream, or a simple idea, inspiration is all around you! As you begin to truly focus and observe, you learn to untrain your eyes to seeing even the common things around in a brand new light. There are many subjects that you can find right inside your home. Things such as magazine clippings, old photos, movies, posters, as well as in nature and in your community. If you are a person who frequently travel or vacation or love to explore, capture those moments as future references. The goal to keep in mind is to choose objects to draw that will help to develop skills. Having a wide selection of widely varying artifacts even before assembling a sketch for your composition will build a good foundation from which to start. It like legos, once you get started, you'll find that one idea leads to another. Try picking one theme, for example, a particular flower to explore consistently over several days or even weeks. Capture written notes about your thoughts and feelings in your sketchbook or images using your phone. 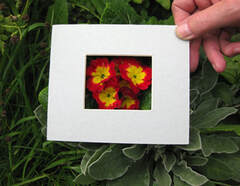 Frame the Composition Now that you have all these ideas, you can now organize them in one or many compositions. One simple device that I use is called a viewfinder to organize the scenery of the subject or scene. Using this simple rectangular cutout, it can be moved up, down, left or right to isolate the most appealing aspects of the scenery present in the photo or outdoor scene. It does this by cropping out the unimportant parts resulting in a much stronger composition. To make one, take a piece of paper, scrap mat board or cardboard and cut a rectangular window in the center to look through. The window opening should be proportionate to the prepared canvas in height and width. For example:
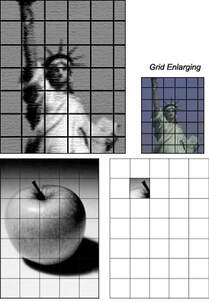 Grid the Composition
Another alternative tool you can use is the Grid Technique. Griding allows you to enlarge and/or transfer your compositions to paper, canvas, or wall mural. You are basically dividing the original image or scene into smaller blocks so that you can more easily see what goes where. Grid enlarging is a useful exercise in helping to improve your drawing and observational skills. I have taught this technique to many students as an Art Teacher and to those learning how to draw. The best part of it is, you don’t have to be skilled in drawing to achieve extraordinary results when using this method. What this entails is to draw or overlay a grid (use transparency film with sharpie) on your reference image and then drawing another grid on your canvas of equal or greater proportion. You then draw the picture onto your canvas concentrating on the contents of each square, one square at a time, until the image has been completed in its entirety. These are just a few techniques that I use to get my ideas out. Rather you are a beginner or a professional, continue to train your eye to frame in your composition and know that it composes well. Once you've assembled your artifacts, it is time to start! The important thing is to experiment and explore what grabs your visual attention. I find it best to play first and look for instruction books later. Find a good book on the principles and elements of the design online or at your local art store as a foundation. Until next time-go create something new! 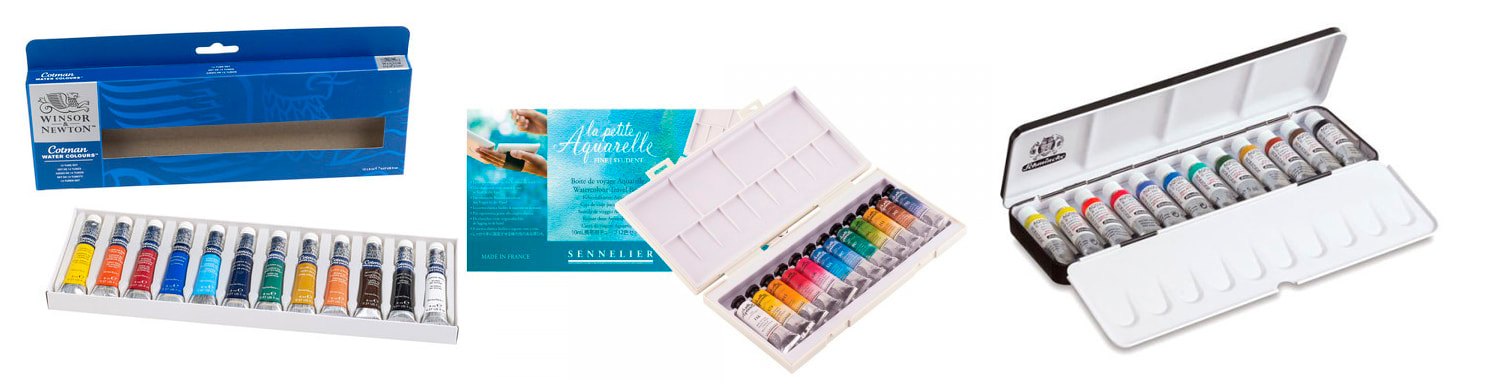 Pictured from L to R Winsor & Newton Cotman Watercolors, Sennelier La Petite Aquarelle Watercolor, Schmincke Horadam Watercolors  In this month’s blog post, I will continue by sharing tips on selecting watercolor paint for creating professional fine art. There are several attributes to consider when thinking about when using watercolors such as quality, color, permanence, transparency, as well as different brand selections.
Watercolors has been my number one source for painting in color. It allows me to create interesting brush effects and highly saturated values without compromising the integrity of the paper. Rather you are a beginner or a professional, figuring out the right combination can bring out the best details in your fine art, sketches, and designs. There’s a variety of paper and paint brands out there for you to choose from ranging from $5 to $500. But all of the watercolor paints contain two main ingredients: finely ground pigment (which provides the color) and gum arabic (which acts as a binder). Manufacturers also add a wetting agent to facilitate flow and absorption, and a moisturizer to stop the gum binder from becoming brittle. Quality Professional Artists' watercolors are more expensive and have a higher concentration of finely ground pigment with high permanence ratings. The benefits will surely outweigh the costs in terms of permanence, intensity, and superior transparency, will last for generations. Beginner’s watercolors may contain cheaper pigments and more fillers and extenders. Your choice depends on what you can afford. Color If you're buying your first watercolor set, start off with a professional artists' quality set or students' quality set (depending on your budget) from a reliable brand and you'll have a good starter color palette that you can add to as needed. Many come with a variation of color values so that you don’t have to make them from scratch. Choose between pans or tubes according to how large your painting will be. You can also experiment with mixing different brands for vibrancy and lightfastness. Permanence Permanence (also called lightfastness) refers to the ability of the paint to withstand exposure to light and humidity without fading, darkening or shifting color. It helps artists to choose colors based on how they will appear as well as how permanent the finished artwork. Lightfastness is shown with an ASTM rating for the pigment. The ASTM abbreviation stands for the American Society for Testing and Materials. This organization has set standards for the performance of art materials including a color’s lightfastness. In this system I is the highest lightfastness available and V is the lowest, though both ratings I and II are considered permanent for artists' use. Look for the ASTM rating on the packaging and accept nothing less than "Excellent" or "Very Good" lightfastness. If a particular brand paint is labeled as N/L meaning "Not Listed", this usually indicates that the pigment or the type of range has not yet been tested by the ASTM. It does not necessarily indicate a lack of lightfastness. Transparency Certain watercolors are more transparent than others. Of course, all watercolors can be made transparent by diluting them with water, but certain pigments hide the underlying paper (or previous wash of color) more than others. Look at the transparency rating when comparing watercolors - Paints are usually categorized as “transparent”, “semi-transparent”, or “opaque”. Pans or Tubes Watercolor paint comes in two different formats: tubes or pans. Tubes are filled with liquid paint, whereas pans are little containers with dried cakes of paint in them. Tubes give you the best of both worlds and can be squeezed right from the tubes for convenience. The paint will slowly dry out, and can easily be re-wetted without any loss of handling quality. You may find it difficult to find paints that perfectly match all your criteria at once. When picking a new color the first things I look for are good transparency and single pigments. If this isn’t possible then I try to get the next best characteristics. Most watercolor paints have very good lightfastness and will still last for many years. I hope this was very helpful in making your selection with the many different brands of watercolors. Until next time, be creative in all that you do! Best Watercolor Paint (Professionals) Schmincke Horadam Watercolors Sennelier La Petite Aquarelle Watercolor Grumbacher Watercolors M. Graham Watercolors Winsor & Newton Professional Watercolors Best Watercolor Paint (Beginners) Winsor & Newton Cotman Watercolors Royal Talens Van Gogh Watercolors Reeves Watercolors Master's Touch Watercolors Happy New Year everyone, 2020 is finally here and I hope you are excited for what’s to come. I hope you will challenge yourselves to greater levels of creativity and learn new skills to further the gifts that you already have. I also hope you will set aside time to grow by stretching yourselves beyond your comfort zone. The key to becoming all that you were destined to be is to “Never say I Can’t!” Begin to declare that “I can do all things through Christ, who strengthens me.” (Philippians 4:13) The Lord honors those who commit their works to Him and who strive for excellence in everything they do. (Proverbs 16:3; 22:29) So go forth and continue to invest in your future! In this month’s blog post. I will be sharing tips on how I select the right graphite pencils and paper for creating professional fine art. There are several things to consider when thinking about the right graphite pencil to add to your collection. In fact, you’ll probably—like most artists—wind up using several different pencils depending on the effect you’re looking for. Rather you are a beginner or a professional, figuring out the right pencil and paper combination can bring out the best details in your fine art, sketches, and designs. Pencil Type There are many brands of pencils on the market to choose from. Throughout high school, college, and even as an art teacher, Prismacolor and Ebony were widely used. They are well known as a general use pencil for sketching, drawing, layout or design work. They can be used with a gentle hand to get very light values or you can create a very dark graphite for heavy shadows and dark tones. Over the years, I began to explore other brands such as Derwent, Prismacolor, Faber-Castell, Staedtler, Tombow, Cretacolor, etc., that you can may give me better shading. I realized key differences in the pencils were the mixture of graphite and clay, which are the two components necessary to achieve smooth strokes and gradients. So, every time there was a 50% coupon at the local art stores, I would purchase as many different brands as a single pencil or a set to test out. Drawing Styles After testing out several different brands, take into considerations your drawing style. Technical drawing will be a little different from sketching and will require detailed lines verses shading. Keep in mind that most artists use more than one type of pencil. Buying a pencil set that comes with a selection of graphite pencils in different grades allows you to switch between different grades. The “H” in the set stands for hardness and “B” for blackness. A standard number 2 pencil corresponds to HB on this scale. The HB scale ranges from 9H, a hard pencil that leaves fine, light marks, to 9B, a soft pencil which a high ratio of graphite that leaves bold, dark marks. 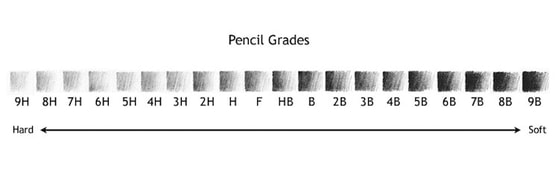 Selecting Different Papers (board) The surface of the paper determines the fineness and range of values which gives different results. Over the last 25+ years, I have used several different kinds of paper such as Arches, Fabriano Artistico, Strathmore, and Canson for my graphite drawings and have found each one to be unique. I have found for my style of drawing that the Strathmore 400 Series Smooth Bristol Vellum Board. This is off-white paper is one of the most versatile, high quality smooth paper and with a uniform surface tooth when blended. To work out the blotches and make a smooth tone simply press harder with the pencil off to the side. But it takes some practice and time. It’s inexpensive and it’s consistent, and produces rich blacks without pressing too hard on the surface. When you're just starting to draw the choices in paper and pencils can be overwhelming. There really is no right or wrong answer when it comes to choosing either. What is more important is which paper you enjoy working with for your particular style.
It may take some time to find the right paper for you and it's likely that you'll change your mind repeatedly as you progress. Until next time, be creative and draw! Hello everyone, Welcome to this months blog post. The holidays are truly upon us with the change in weather, and all the Christmas parties and shopping. In this months post, I will demonstrate by showing you a time lapse video of the creation of "Fervent Prayer." It combines realistic elements of someone postured in prayer for our government leaders, as an area of importance to see change. Congress is charged with drafting, debating and sending bills to the president to be signed into law. Despite all the division the media provides, it is important that we continue to pray for our nation's 100 senators and 435 representatives from 50 states who manages their legislative business. The Bible instructs us to posture ourselves in praying for the affairs of the nations in which we live. As I gathered my thoughts to create this work of art, there were many reference shots I studied of government buildings in Washington along with two scriptures to lay the foundation. In 1 Timothy 2:1-2, it says, “Therefore I exhort first of all that supplications, prayer, intercessions, and giving of thanks be made for all men, for kings and all who are in authority, that we may lead a quiet and peaceable life in all godliness and reverence”. James writes about Elijah: “The effective, fervent prayer of a righteous man avails much. Elijah was a man with a nature like ours, and he prayed earnestly that it would not rain; and it did not rain on the land for three years and six months. And he prayed again, and the heaven gave rain, and the earth produced its fruit.” James 5:16-18 So regardless of what type of person the leader may be, we still must pray. You may say, "What shall I pray for?" We can ask God to act and steer matters in order that we can live “a quiet and peaceable life in all godliness and reverence.” We can also ask God to watch over every branch of the military who protect the safety of our homeland, for the sake of our families and other loved ones. Now is the time more than ever to become a "Fervent Prayer". Hello everyone, Welcome to this months blog post. I just recently attended an art show and one of the comments made were, "You have so much details in your work." My response was very simple, "I really care about the art I make. " I figured if you are going to do something do it right! Sometimes that is easier said than done. In this months post, I will be sharing three key ingredients needed to produce really great works of art. I will also demonstrate by showing you a time lapse video of the creation of "Lion of Judah." Every piece of artwork I have created involves three key ingredients, time, patience, and technique. These are things I set in place to motivate myself to advance my skills, to produce great works of art. TIME If you have a full time job, raising a family-the list goes on, the thought of making time for creating art can feel overwhelming. Despite the fact that your day may be full of tasks, you can still carve out at least one hour a day. Doing a little bit each day might not seem like a lot, but over time it adds up. I usually set aside time around 10 pm when everyone is about to go to bed. That gives me a good two hours of quiet quality time and no one is asking me to do any chores around the house. Another way to make time is to reduce screen time. Usually the time you spend watching tv or surfing the internet or social media could be used to get a rough sketch completed for drawing or painting. Another thing is having the ability to say "no" to those activities that aren't going to get you closer to your goal of completing the artwork in a timely manner. Remember "Time" is the most valuable thing we have if we use it wisely. PATIENCE Having patience to complete a work of art requires us to work at a more realistic pace. Perfection doesn't happen overnight. We are talking about mindsets here. As you are patient with the process, you will begin to unlock potential that you thought you never had. The focus switches from trying to hurry up and finish to, I just learned new techniques that could be applied to the next project. You will also find that every impression, stroke, or mark that you make has a purpose and you can step back from it for refinement. In this project, "The Lion of Judah," I used several graphite pencils to produce many gradient layers in the hair for realism. The more detail a work requires, the more patient you will need to be. TECHNIQUE The elements and principles of design is the key ingredients to create the perfect piece of original art. Even with one picture or subject matter, you can create a variation of works. Understanding these techniques opens the door to a myriad of options such as color schemes, textures, and other opportunities for different audiences. The importance of natural repetition in a work is the presence of variation. The variation of repeated shapes helps the brain comprehend one shape and immediately knows the rest of the shapes are identical. It causes the viewer to subconsciously engage with the work. Another important technique is the correct placement and spacing. This will draw attention to the focal point of many variation of things within a piece. Strangely, to randomly place elements in our paintings in a convincing way takes careful consideration. We have a hard wired expectation for random placement. We see it all the time in nature and in the unconscious distribution of objects around us. When we see a contrived order to what should appear random, it just doesn’t look right. Keep a conscious eye on the placement of every element of your paintings. It will soon become second nature to get that placement, spacing and variation to look just right. Until next time, go create something beautiful! The making of "Lion of Judah." Visit the online store for purchasing your print.  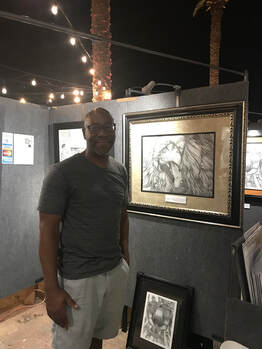 After much anticipation, the new site is here...
Where do I begin. Let's start off by saying "Thank You" for visiting the site and you are definitely in for a treat. I've had many requests over the past two years to make not only my fine art available for sale, but share a little bit about who I am and what I do. I have learned that "having and understanding of something is one thing, but what to do with it is another." I have acquired many skill sets over the years and will share my knowledge along with other resources as well. Despite my home, community, city, and state being affected by Hurricane Michael, October 10, 2018, I was still able to keep my spirit high and produce works of art. This setback has truly become a setup for a deeper appreciation for the gifts and talents that I have. Not to take them lightly but make time for development and growth. Even if I only have one hour a day to set aside, use it to produce something great. So stay tuned and more great resources are coming! Blessings |
welcomeHello and welcome to my blog. Here I will share videos of projects, lessons, stories, upcoming events, and sites of use, Archives
July 2020
Categories |
 RSS Feed